
The menu for the Rockstar Editor
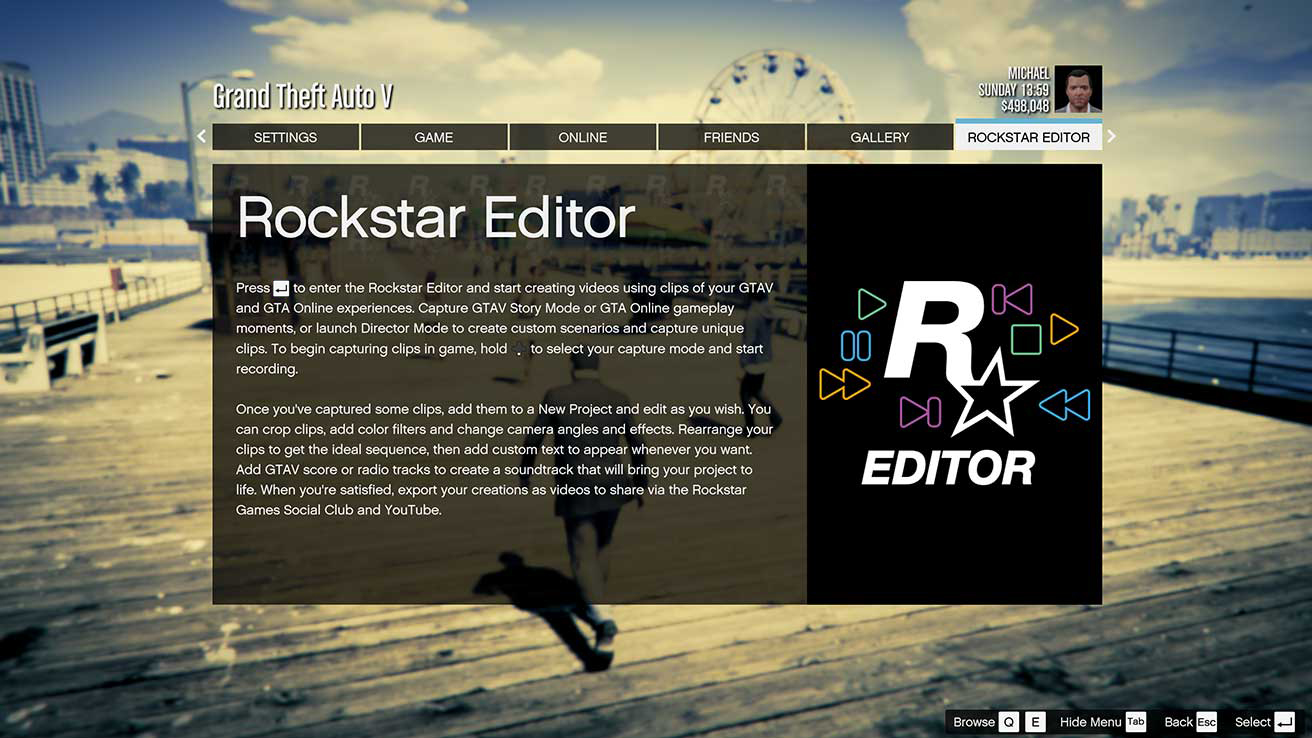
The Rockstar Editor allows player to create, edit and share videos of their adventures on Grand Theft Auto V and Grand Theft Auto Online.
Players can build a library of captured footage using Manual or Action Replay recording modes, add their clips to the Project Timeline, and use the Clip Edit mode for fine edits. The final, polished product can then be uploaded to YouTube and the Rockstar Games Social Club to share with your friends (or people you don’t even know).
How to Record Clips in GTA 5 and GTA Online
Accessing the Rockstar Editor
You can access the Rockstar Editor from within the pause menu from within GTA 5. Note that you must be in single player GTA 5 (not in GTA Online) to see the option to enter the Rockstar Editor.
Clip Details
- You can define the amount of hard drive space the Rockstar Editor can use to store clips in Pause Menu > Settings > Rockstar Editor
- The length of an Action Replay clip stored is dependent on the amount of activity that has taken place during recording. In busy segments this tends to average 30 seconds, in less eventful segments this will be closer to 1 minute 30 seconds.
- Clips are named automatically upon saving, in the format �?Month DD YYYY Clip XXXX’ (e.g., �?Jan 13 2015 Clip 0001’).
- You’ll be notified if you are running out of space to store clips. You can visit Pause Menu > Rockstar Editor > Clip Management to delete unwanted clips and free up more space.
Menu Options
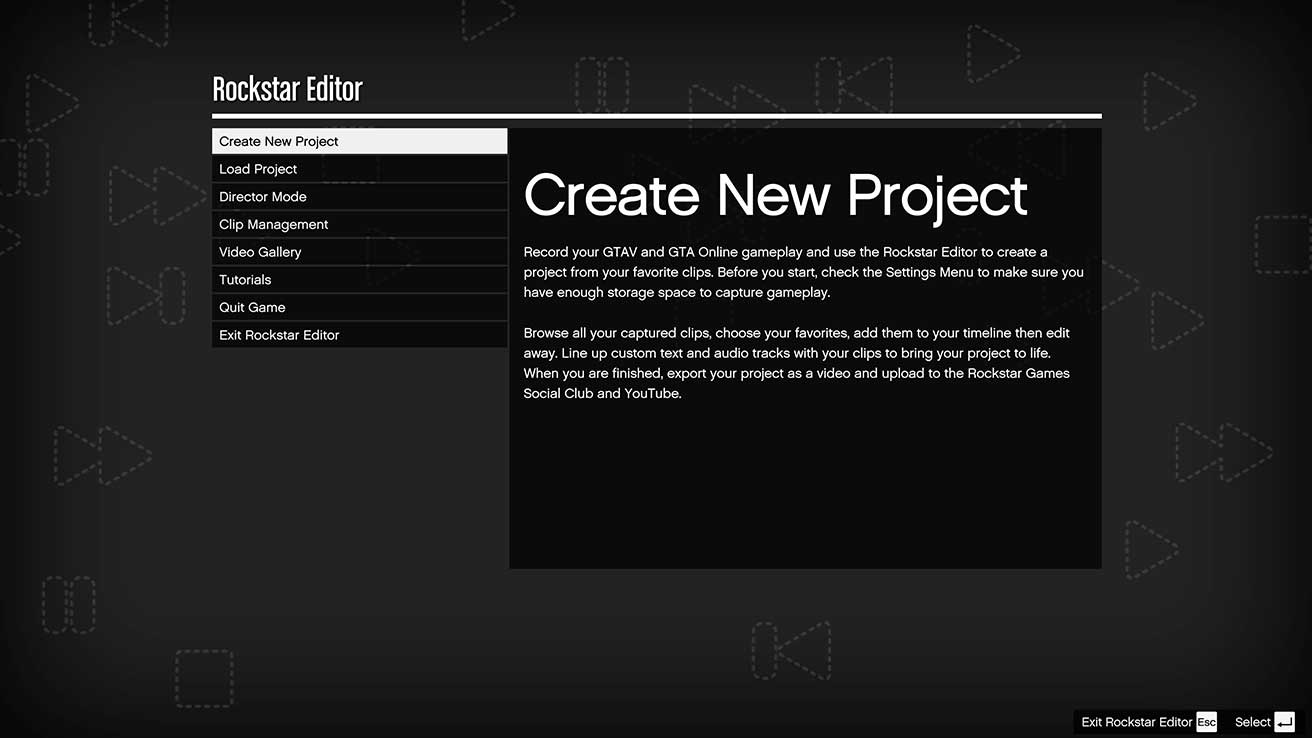
The Rockstar Editor Main Menu has six different options:
Create New Project
Creates a brand new project from clips that have been recorded.
Load Project
Load and work on a previously saved project.
Director Mode
One of the access points for launching Director Mode.
Clip Management
Preview and manage your recorded clips.
Video Gallery
Where exported videos are available to view and upload to YouTube and the Rockstar Games Social Club.
Tutorial
Helpful information for learning how to use the Rockstar Editor.
Creating A New Project
To create a new project, choose �?Create New Project’ then �?Add Clip’. Select from your recorded clips and place them on the timeline. Once you’ve placed a clip press ENTER or double click each clip to edit.
- Use LEFT CTRL and X to �?pick up’ and move highlighted clips on your timeline to a different location, or click and drag them. Delete clips with DEL, duplicate a clip with LEFT CTRL and C, or use the mouse wheel to scroll through the timeline.
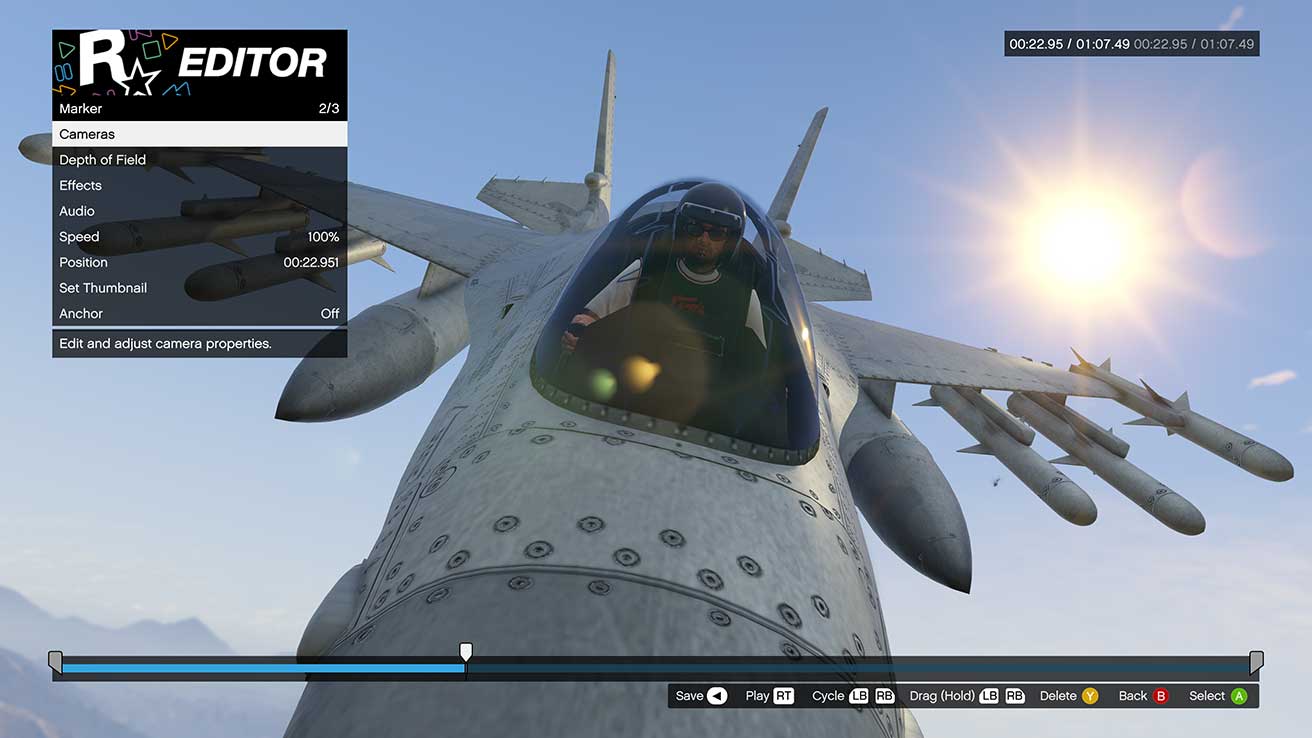
Control Panel
The control panel is present in the top right of the screen, displaying the current clip time, total clip time, and has buttons to Return to the Beginning, Rewind, Play/Pause, Fast Forward, Go to the End, Skip to Previous Marker, Add New Marker, and Skip to Next Marker. Note, this control panel will not be visible when using a gamepad.
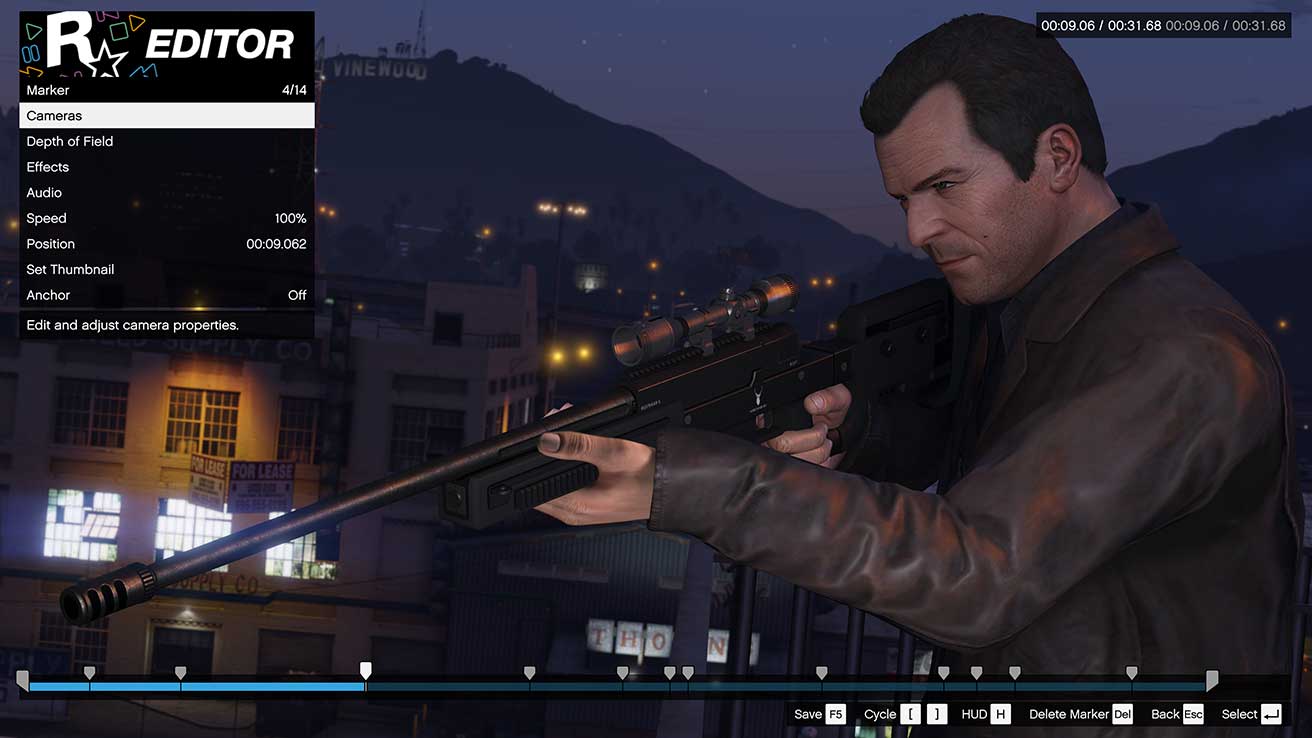
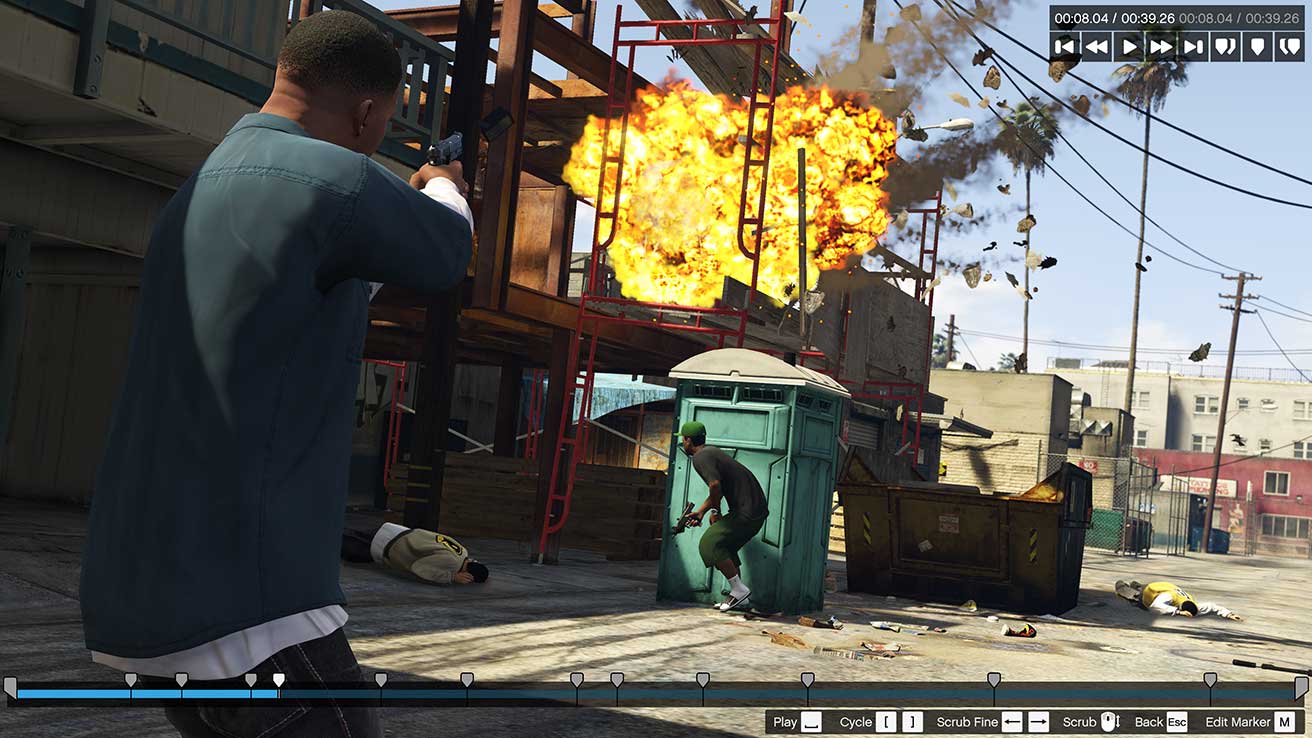
Markers
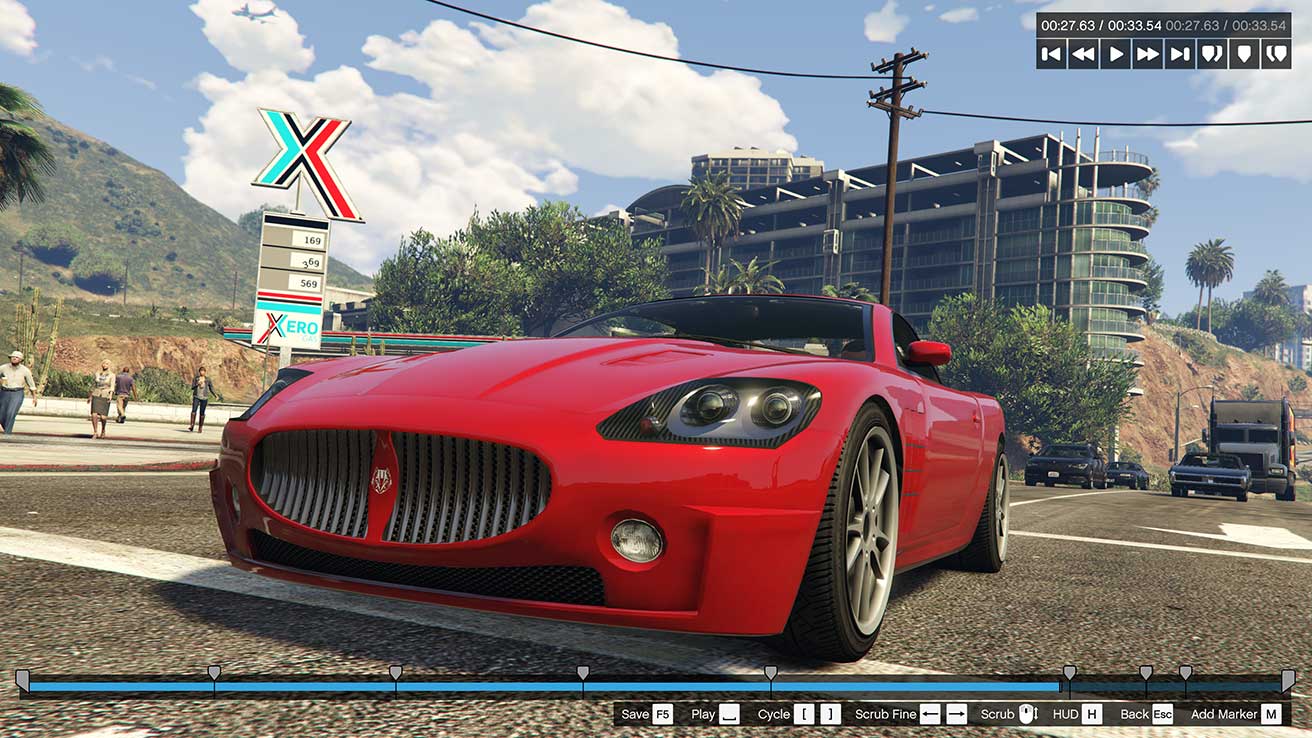
Clip edits can be made by adding �?Markers’ that you can place anywhere on your clip. These allow you to change numerous variables like camera angles, effects, video speed and more.
Use the MOUSE WHEEL or LEFT ARROW and RIGHT ARROW to scrub through your clip and find the best places to add markers. With a marker selected, the LEFT ARROW and RIGHT ARROW will control the marker menu.
Add markers by pressing M at your desired point on the timeline. This will bring up a menu in the top left of the screen with all the available editing options. Choose from different filters, camera angles, audio options, clip speed, and depth of field – all individually customizable to help you create a genuinely unique video.
- Edit the length of your clip by selecting the start and end points of the clip and dragging the cursor to a new location within the clip.
Default Marker Properties
When you add a new marker, it will share the exact properties of the preceding marker on the timeline, if one exists. However, once a marker has been placed, any changes made to surrounding markers will not affect your new marker.
- If you want a certain visual effect to be applied throughout your clip, set it on the Start Point before placing any markers.
- To change the same setting across multiple markers, open one marker and press Tab to jump to the same menu option on the next marker. You can cycle through and edit the same property across your whole clip in this way.
Anchors
On each marker there’s the option to enable an anchor. If you enable an anchor on a marker, this places an anchor point at the same position on your Project Timeline which you can use to precisely position text or audio. There are three anchor options available:
Anchor Off
All editing options are available on this marker but no anchor point will display on the Project Timeline.
Exclusive
Converts the marker to be an anchor point exclusively, so that no other edits can be made to that marker (and any adjustments you have already made will be disregarded). Exclusive markers are yellow on your clip timeline.
Anchor On
All the editing options are available on this marker and an anchor point will display on the Project Timeline.
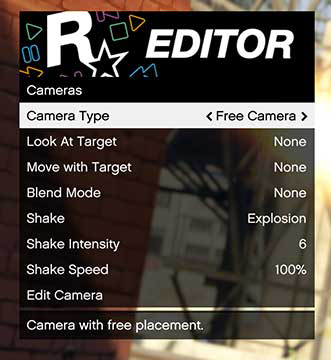
Cameras
You can edit the camera angles used in most clips; however, remember you will not be able to edit the camera view in some clips, such as any clips captured in First Person Mode. Clips that have camera angle restrictions will be designated as such while in the Clip Management menu. There are several different types of cameras to choose from:
Game Camera
The game camera will match the camera movements exactly as they appear while recording the clip.
Pre-set Camera Angles
There are several pre-set camera angles that lock to the character either at the front, rear, sides or overhead. You can also zoom in and out from pre-set camera angles if you wish.
Free Camera
This enables you to place the camera independently from your character, but still within a defined area where the action is taking place. You can position the camera to capture a moment of action that is taking place away from your character. Use Look at Target to lock onto your character, or Move with Target options to lock the camera onto a target and track them as they move, creating a smooth pan. While using the free camera, experiment with Blend Mode to create dynamic camera movement and transitions.
- It is also possible to apply and vary the intensity of camera shake, which can be used to great effect with explosions or crashes.
Effects
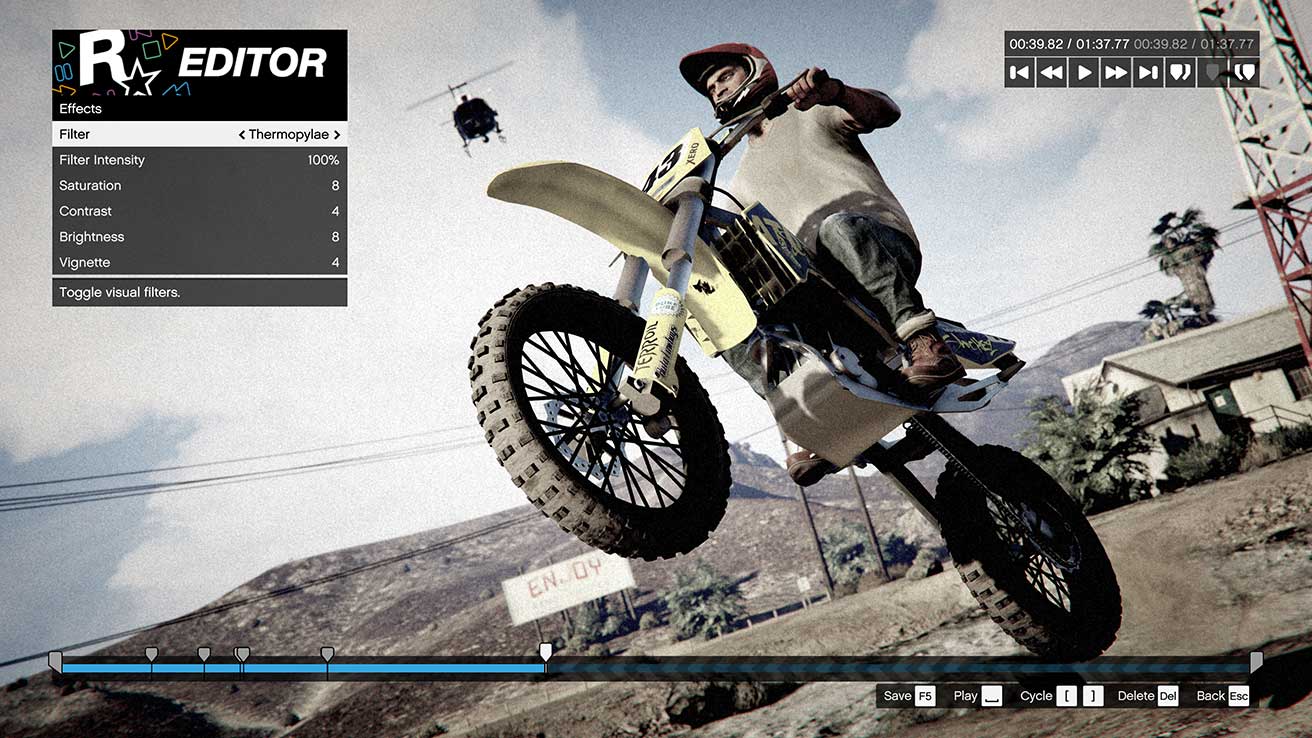
Different effects can be applied to your footage, with customizable levels of intensity, saturation, brightness, contrast, and vignette.
Depth Of Field
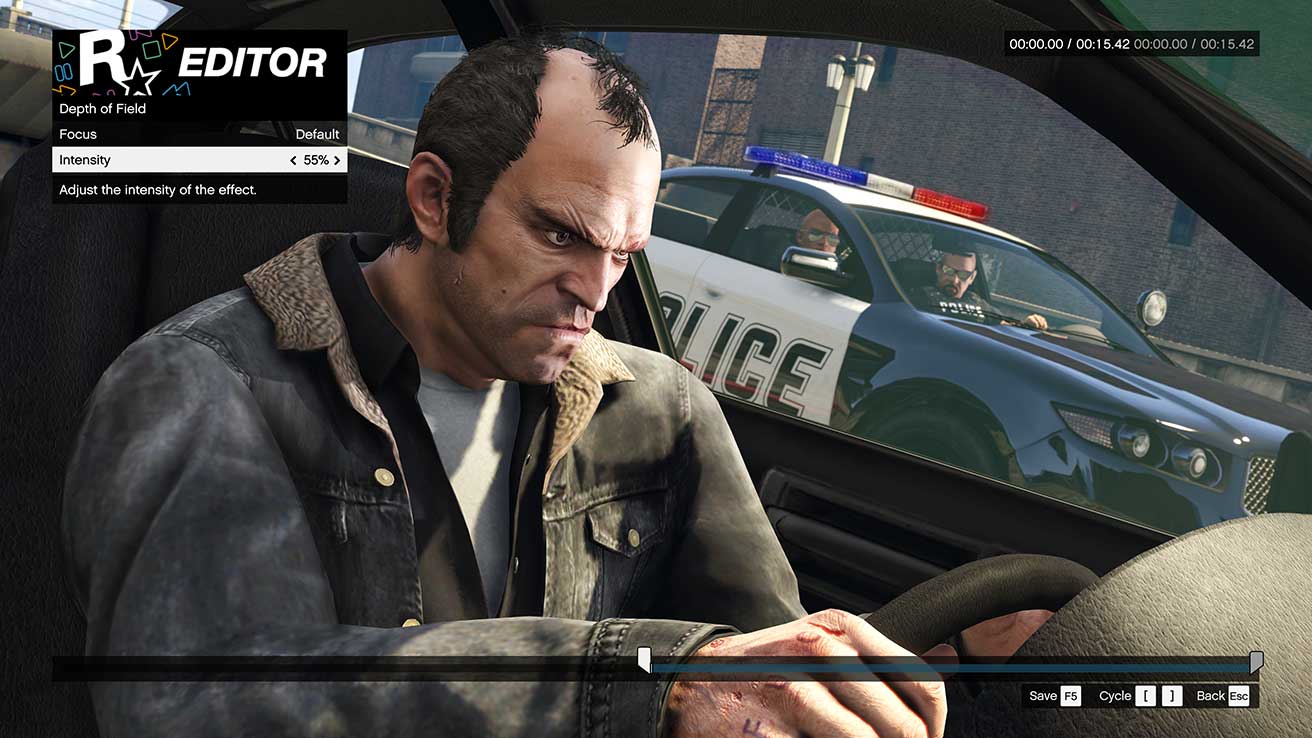
A depth of field effect can be added, allowing you to customize what’s in focus throughout your clip. You can adjust the type of focus and the intensity of the effect, and also set a focus target so that your settings track a chosen character.
- Within the Pause Menu, you must enable the ability to edit depth of field settings, but please note you must be running Direct X 11, and have Post FX set to �?Very High’ or �?Ultra’.
Audio Options
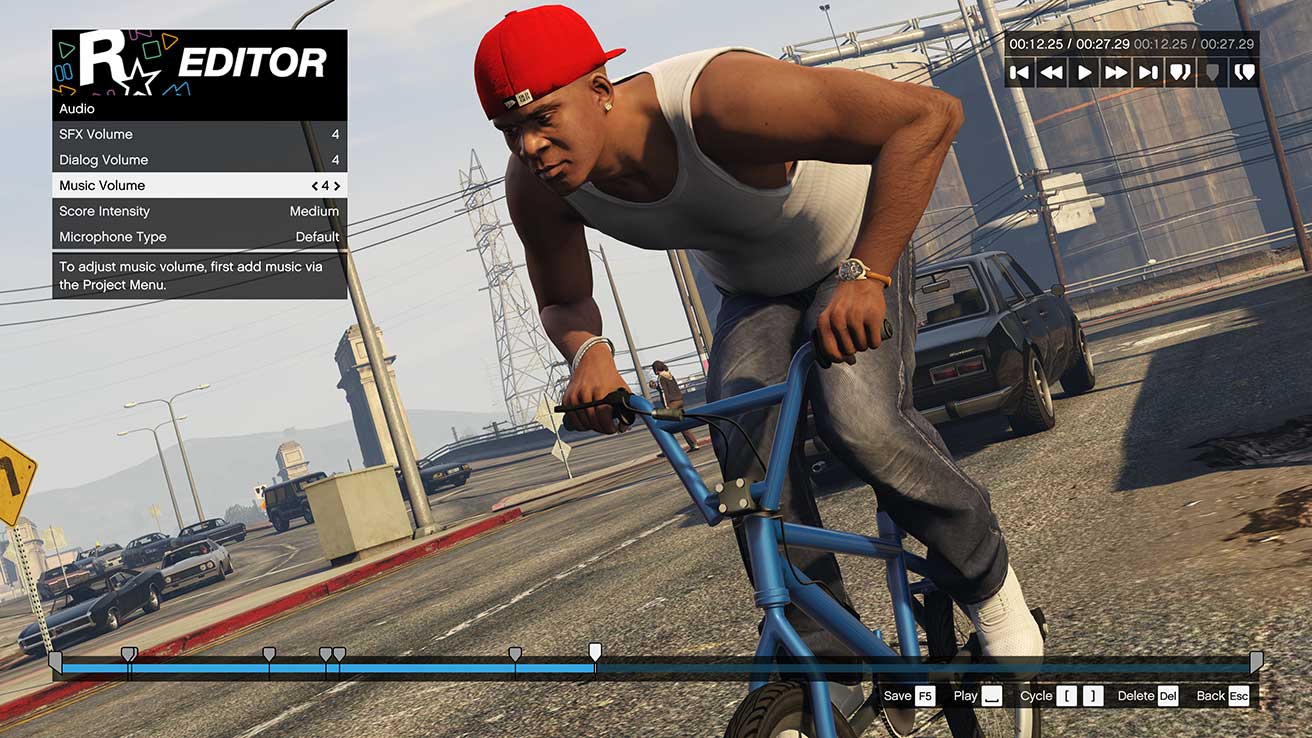
Use this menu to adjust the levels of volume for sound FX, dialogue and music throughout your clip. It is also possible to set the score intensity level in order to build the dynamic score to a crescendo in a scene or to reduce the pace of the score at any moment.
Speed
The speed of your footage can be adjusted to give the appearance of slow motion or sped up action. Speed will be adjusted between the currently selected marker and the next marker after it.
Thumbnails
Capture thumbnail images at any point and apply them to your clips in place of the default thumbnail, so you can easily identify certain clips on your Project Timeline.
Navigation

Cycle between the markers you have placed by pressing [ or ]. Use the Position option in the Marker Menu to change a marker’s location on the timeline.
Once you’ve added all the markers you want, press F5 to save your changes followed by ESC to return to your timeline.
Switch between your Timeline and the Project Main Menu using the ESC key.
- To drag a marker to a new position, while keeping all its properties, hover the cursor over the marker, hold down LEFT MOUSE BUTTON and scrub to a new location on the timeline.
Adding Audio
After you’ve added, edited and ordered your clips in your timeline, select �?Add Radio Track or �?Add Score Track’ from the Project Main Menu to add music to your project.
You can choose from both GTAV Radio tracks and original pieces of the GTAV Score.
Radio Tracks
Choose from a selection of songs from the GTAV radio stations.
Score Tracks
Select from original GTAV score tracks, each with five variable levels of intensity.
Choose which type of music best suits your project, select it and simply place it on your timeline, using the CURSOR to move the play head and LEFT MOUSE BUTTON or LEFT CTRL and V to place. Use the Skip to Beat function to synch to the beat of the music. You can reduce the length of your audio to fit your clip.
- You can place multiple Radio Tracks to your project. If using more than one track in your project, each track must be a minimum of: 30 each.
- Use the intensity levels of GTAV score tracks to escalate, diminish and resolve drama or action.
Microphone Type
Affect your clip’s audio by defining Microphone Type in the Audio options to use a default microphone, a cinematic microphone, a microphone positioned at the camera or a microphone positioned at the target.
Adding Text
Add text to your project by selecting �?Add Text’ from the Project Main Menu. Enter the text of your choice and then use the menu options to define the following properties:
- Size
- Position of your text
- Font
- Color
- Opacity
- Duration
Previewing Your Project
Use the Full Screen Preview function from the Project Main Menu to check out your progress in full-screen mode.
- Use this mode to check your edits without having to export your project.
Saving Your Project
Use �?Save Project As’ in the Project Main Menu to change the name of your project or to save different versions of the same project. Press F5 to use the �?Save’ function periodically to make sure you don’t lose any of your progress.
Please note that when uninstalling the game all rendered videos created in the Rockstar Editor will be deleted. Clip and project data however will remain. If desired, the deleted videos can be regenerated with this data after a fresh install.
Exporting Your Project
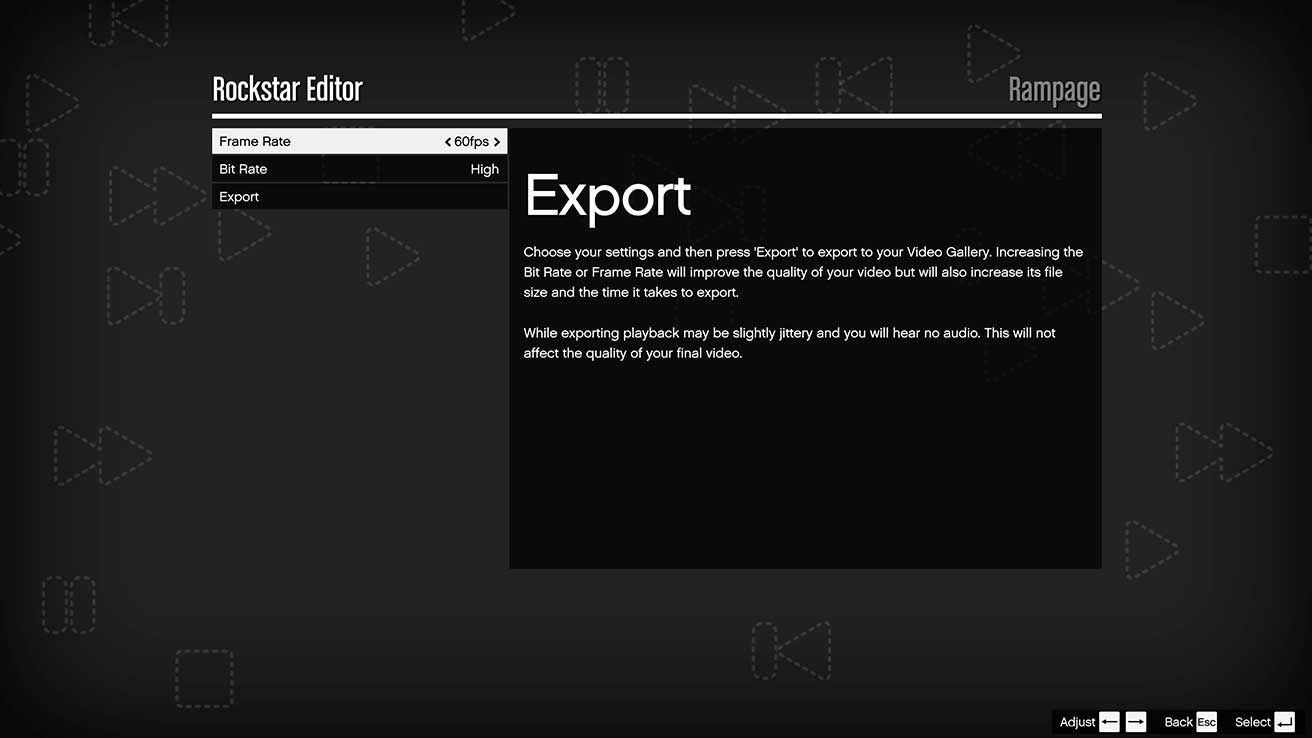
Export your project once you are done by selecting �?Export’ in the Project Main Menu. Set Frame Rate and Bit Rate using export options. The export will take slightly longer than the length of the video and while clips will appear on screen, audio will be removed during the export process.
This finished video will appear in your Video Gallery in the Rockstar Editor Main Menu ready to be viewed in full screen seamlessly and also uploaded to YouTube or the Rockstar Games Social Club.
Director Mode Overview
Director Mode is a brand new option that, in conjunction with the Rockstar Editor, allows more freedom to create a truly unique video. Choose from a cast of characters and creatures including story characters, Los Santos and Blaine County residents, and animals. You will be able to trigger a number of actions and phrases of dialogue as well as dictating other variables such as weather, time of day and locations in the world.
Use all of these tools to create diverse video footage that can then be used in the Rockstar Editor in the same way as footage captured in GTAV Story Mode and GTA Online.
Access
To access Director Mode you must have Story Mode running. You can access Director Mode in a number of different ways:
Via the Pause Menu
Access the Pause Menu [ESCAPE] then navigate to the Rockstar Editor tab before finally selecting the Director Mode menu option.
Player Interaction Menu
Bring the Player Interaction Menu up by pressing M and select the Director Mode menu option.
- You have to be on foot to select Director Mode from the Player Interaction Menu, without a wanted level.
- While playing in Director Mode, hold M to access the Director Mode Menu.
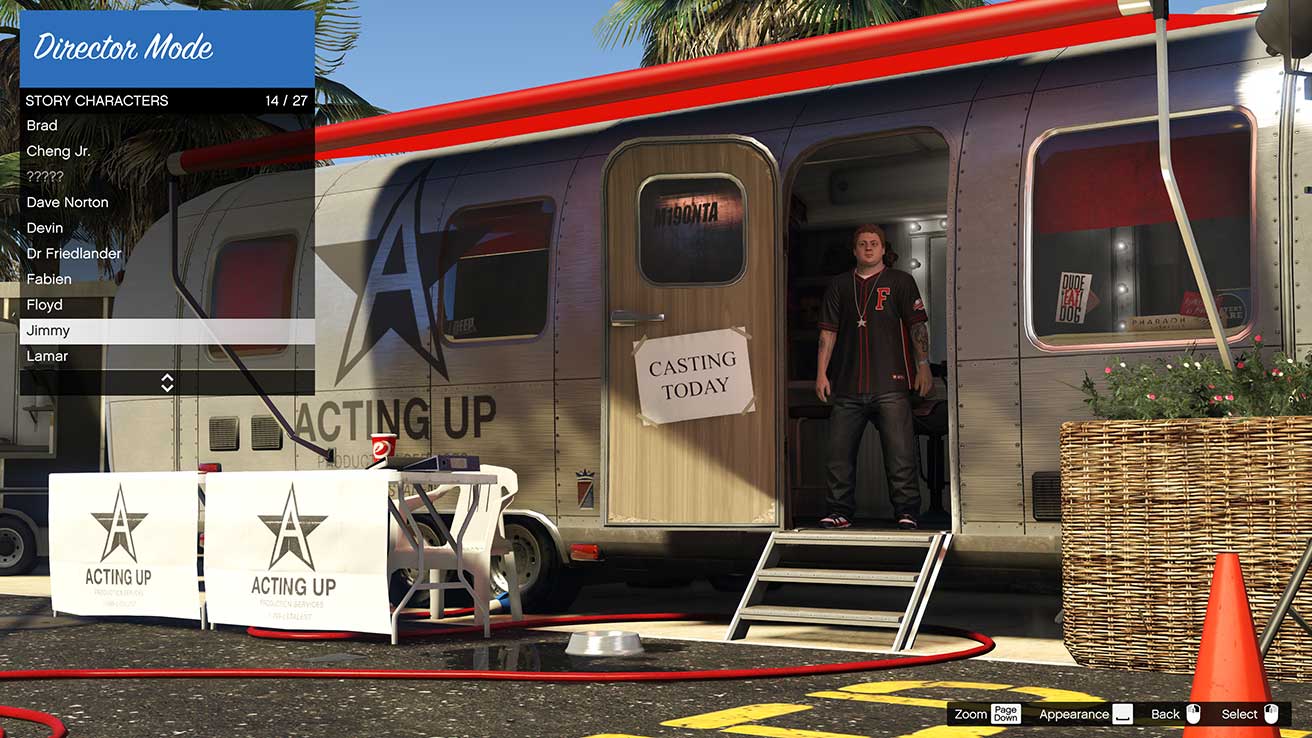
Casting Menu
Choosing a Character
Navigate to the Actors menu to choose which character you would like to play as. The complete roster of available characters unlocks as you progress through GTAV Story Mode. Eligible characters will have access to your Story Mode weapons and vehicles, although some characters are unable to drive or use weapons (characters with these restrictions are noted in the Casting Menu.) Highlight the character you would like to play as and press ENTER to select and spawn them into Los Santos at your last location.
Randomize
Use the Appearance option on any human characters or animals with different fur/pelt variants by pressing SPACEBAR (this may change fur color for animals, or hair style, accessories, facial hair or skin color for human characters).
Shortlist
Use the Shortlist function by pressing TAB to add up to 10 characters to a list that can be accessed via the Director Mode menu to instantly swap out characters without having to return to the Casting Trailer. Be aware of these requirements:
- You will not be able to swap out characters that are driving.
- If you are playing as a bird and you swap to a different animal or human character, you will be spawned at the nearest point at ground level.
- You cannot switch characters while recording.
Unlocking Characters
As you progress through GTAV Story Mode, various characters will unlock: Animals, Special Characters and Heist Crew members are examples of characters that will unlock as you progress through the storyline.
Settings Menu
Before spawning into the Director Mode world you can also set some parameters for the session you are about to launch. By selecting �?Settings’ you will access a menu where you can change the settings for the following options:
Time of Day:
Choose the time of day from the following options: Pre- Dawn, Dawn, Morning, Midday, Afternoon, Sunset, Dusk, Midnight.
Weather:
Choose the weather from the following options: Clear, Broken Cloud, Overcast, Hazy, Xmas, Smog, Fog, Rain, Thunder.
Wanted Status:
Choose your wanted status from the following options: Disabled, Normal, Low, Medium, High.
Pedestrian Density:
Choose the density of pedestrians from the following options: None, Low, Medium, High.
Vehicle Density:
Choose the density of vehicles from the following options: None, Low, Medium, High.
You can also toggle Restricted Areas, Invincibility, and a range of other special settings on and off.
- Use the player interactions menu to change these settings while in the Director Mode world.
Cheats
The Director Mode fully supports Story Mode cheats. Use them to bring a unique and entertaining aspect to your custom videos.
Uploading to YouTube
YouTube Upload Status
Once you have exported a video, you can choose to upload it to YouTube from your Video Gallery.
All videos will be uploaded to YouTube; any videos uploaded as Public or Unlisted will also be linked on Rockstar Games Social Club. You can set your YouTube upload status as Public, Private or Unlisted in the Rockstar Editor tab of the Settings menu. Any videos you upload will use the last defined status.
Video Requirements
- The video must be at least 1 second long
- The video must not be a duplicate of a video that the user has already uploaded, even if titled differently.
- The video must not have a title with restricted language.
User Requirements
- You must have a Rockstar Games Social Club account and be signed into that account when uploading.
- You must have a Google Account with a YouTube channel (this exists by default with most modern Google or Gmail accounts).
- You must connect your Google Account to your Social Club account. This only needs to be done once and can be completed in-game during the upload process.
- Your YouTube account must be verified in order to upload a video longer than 15 minutes.
- You must accept the Rockstar Games and YouTube sharing policies for each upload.
- Your YouTube and Social Club accounts must have the relevant permissions (i.e. not banned for bad behaviour).
Video Metadata
When a video is uploaded to YouTube, certain metadata will be set for that video, some of which is customizable:
- Video file size
- Video duration
- Publish date
- Platform
- Game title
- Video title (an upload title must be entered)
- Video description (optional – you can enter this if you choose)
- Video tag (optional – you can enter this if you choose)


